As an Amazon Associate, I earn from qualifying purchases.
Have you ever wanted to create a unique and trendy distressed hoodie? Distressed clothing has become increasingly popular in recent years, and making your own distressed hoodie allows you to customize it to your liking. In this article, we will guide you through creating a distressed hoodie step by step. Whether you’re a fashion enthusiast or simply looking to upgrade your wardrobe, this DIY project is a great way to express your creativity.
1. Materials Needed
Before you start making your distressed hoodie, gather the following materials:
- Hoodie of your choice
- Scissors
- Tweezers
- Sandpaper or pumice stone
- Bleach (optional)
- Fabric dye or fabric markers (optional)
- Iron-on patches or pins (optional)
- Washing machine
2. Choosing the Right Hoodie
Select a hoodie that you want to distress. Consider the color, fabric, and style that best match your preferences. Remember that certain fabrics, such as denim or cotton, work well for distressing.
3. Preparing Your Workspace
Find a clean and well-lit area where you can work comfortably. Lay down a protective covering to avoid damaging surfaces. Ensure you have access to water and ventilation if you’re using bleach.
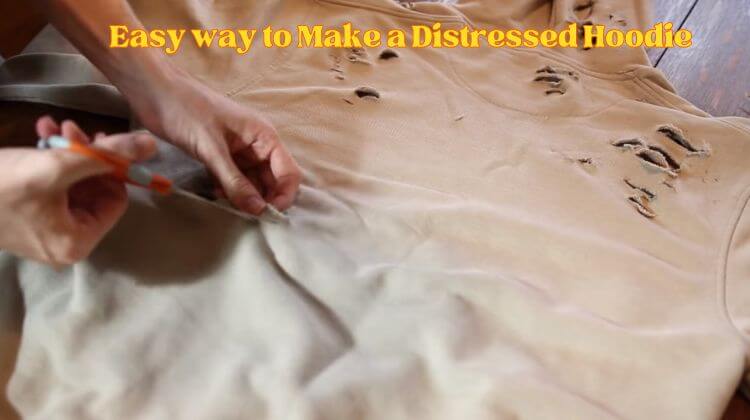
4. Creating Ripped Holes
Using scissors, carefully cut small incisions where you want the distressed holes to be. Start with minor cuts and gradually increase their size to achieve the desired look. Remember to space them out evenly for a balanced appearance.
5. Fraying the Edges
To create a frayed effect, tweezers pull the horizontal threads around the cut edges. Gently tease the threads until they loosen and fray, creating a worn-out look. Repeat this process for all the cut holes.
6. Distressing the Fabric
Use sandpaper or a pumice stone to rub against the fabric’s surface for a more worn and faded appearance. Focus on areas such as the cuffs, collar, and pocket edges. This process will give your hoodie a distressed and vintage vibe.
7. Bleaching Techniques
If you want to add a unique touch to your distressed hoodie, consider using bleach. Dilute bleach with water in a spray bottle and spritz it onto specific areas of the hoodie. This will create a bleached effect that complements the distressed look. Remember to wear protective gloves and work in a well-ventilated area.
8. Adding Graphics or Embellishments
To further personalize your distressed hoodie, consider adding graphics or embellishments. You can use iron-on patches, fabric markers, or pins to enhance the overall aesthetic. Get creative and choose designs that align with your style.
9. Washing and Finishing
Once you’re satisfied with the distressed look and any additional embellishments, it’s time to wash and finish your hoodie. Follow the care instructions on the hoodie’s label. Cleaning it will help soften the distressed areas and give it a more natural appearance.
10. Styling Your Distressed Hoodie
Now that you’ve created your distressed hoodie, it’s time to style it. Pair it with jeans or leggings for a casual and trendy look. You can wear a denim jacket or enhance it with a statement necklace to add more style. Experiment with different combinations to showcase your unique style.
11. Tips for Maintenance
To maintain the longevity of your distressed hoodie, follow these tips:
- Wash it inside and out to prevent excessive fading.
- Avoid using harsh detergents or bleach during regular washes.
- Air-dry-your hoodie instead of using a dryer to prevent further distress.
- Store it in a cool and dry place to avoid mold or mildew growth.
Conclusion
Creating a distressed hoodie allows you to unleash creativity and personalize your wardrobe. This article outlines steps that can help you turn a plain hoodie into a fashionable accessory. Remember to experiment with different distressing techniques and have fun throughout the process. Express yourself through your unique style and confidently rock your custom-made distressed hoodie!