As an Amazon Associate, I earn from qualifying purchases.

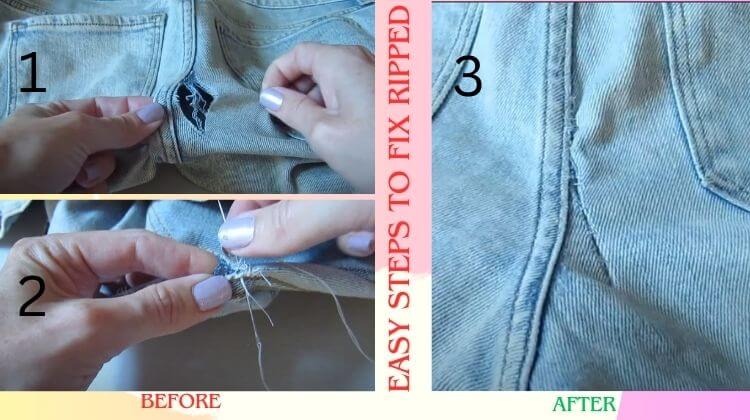
Ripped jeans are a popular trend, but when the rip is on the bum, it can lead to discomfort and embarrassment. Fortunately, you can fix this issue and extend the lifespan of your jeans with a few simple repair techniques. Whether you prefer hand sewing, machine sewing, or using an iron-on patch, this guide will walk you through the process, ensuring your ripped jeans look great once again.
How to Fix Ripped Jeans on the Bum
2. Assess the Damage
Before you begin the repair process, closely examine the rip on your jeans. Evaluate its size and location, which will help you determine the most appropriate repair method. Small tears may only require a simple sewing technique, while larger ones might benefit from an iron-on patch.
3. Gather the Necessary Tools
To fix ripped jeans on the bum, you’ll need a few essential tools:
- Needle and thread (color matching the jeans)
- Sewing machine (optional)
- Iron-on patch (optional)
- Fabric scissors
- Pins
- Measuring tape
- Seam ripper (if necessary)
- Fabric glue (optional)
4. Prepare the Jeans
Before repairing the rip:
- Ensure your jeans are clean and free of any dirt or debris.
- Turn them inside out and place them on a flat surface.
- Smooth the area around the rip to make it easier to work with.
5. Choose the Repair Method
You can use several methods to fix ripped jeans on the bum. Choose the one that suits your skills and the extent of the damage.
5.1 Hand Sewing
Hand sewing is a traditional method that can work well for small to medium-sized tears. It allows for greater control over the repair and ensures a more discreet finish.
5.2 Machine Sewing
If you have access to a sewing machine and the rip is extensive, machine sewing can be a quicker and more efficient option. It provides more substantial and durable stitches, making it ideal for heavy-duty repairs.
5.3 Iron-On Patch
Iron-on patches are a convenient option for fixing ripped jeans, especially if you need more confidence in your sewing skills. These patches come in various colors and designs, allowing you to add a stylish touch to your repaired jeans.
6. Start the Repair Process
Follow the appropriate method below based on your chosen repair technique:
6.1 Hand Sewing Method
- Step 1: Thread your needle and tie a knot.
- Step 2: Insert the needle through the fabric on one side of the rip and pull it through until the knot catches.
- Step 3: Begin stitching along the tear, using tiny, even stitches.
- Step 4: Continue stitching until you reach the end of the rip, then knot the thread and trim any excess.
6.2 Machine Sewing Method
- Step 1: Configure your sewing machine and select the appropriate thread.
- Step 2: Place the jeans under the machine’s needle, positioning the rip in line with the presser foot.
- Step 3: Lower the presser foot and start sewing, following the tear line.
- Step 4: Backstitch at the beginning and end of the repair to secure the stitches.
6.3 Iron-On Patch Method
- Step 1: Preheat your iron according to the patch manufacturer’s instructions.
- Step 2: Place the patch over the rip, completely covering the damaged area.
- Step 3: Apply the iron to the patch, pressing firmly and evenly for the recommended duration.
- Step 4: Allow the patch to cool before checking its adhesion. If necessary, repeat the ironing process.
7. Reinforce the Repair
To strengthen the repair and avoid further harm, consider stitching around the edges of the repaired area. This will provide additional strength and stability to the jeans.
8. Finishing Touches
Trim any loose threads and give your jeans a final inspection. Ensure the repaired area looks neat and matches the original fabric as closely as possible. Use fabric scissors to trim any excess thread or fabric for a clean finish.
9. Wash and Care Instructions
To maintain the integrity of the repair, follow these guidelines when washing and caring for your fixed jeans:
- Turn the jeans inside out before washing to protect the repaired area.
- Wash your jeans in cold water to prevent color fading and damage to the repair.
- Avoid using harsh detergents or bleach that could weaken the fabric or stitching.
- Air dry your jeans or use a low heat setting on your dryer.
Conclusion: How to Fix Ripped Jeans on the Bum
Don’t let a rip on the bum ruin your favorite pair of jeans. Following this guide’s instructions, you can repair ripped jeans and prolong their lifespan. Whether you hand sew, machine sew, or use an iron-on patch, you can restore your jeans to their former glory. Embrace the DIY spirit and give your jeans a second chance.
FAQs: How to fix ripped back pocket on jeans
10.1 Can I use fabric glue instead of sewing?
While fabric glue can temporarily fix it, it is not as durable as sewing. For a more lasting repair, it’s recommended to use sewing techniques.
10.2: Is it possible to make the repair invisible?
Making the repair completely invisible can be challenging, especially on heavily distressed jeans. However, choosing a suitable thread color and employing precise sewing techniques can help the repair blend in more effectively.
10.3: How long will the repair last?
The longevity of the repair depends on various factors, such as the extent of the damage, the repair method used, and how well the jeans are cared for. A well-executed repair can last a long time with proper stitching and reinforcement.
10.4: Can I still achieve a distressed look after the repair?
Yes, it’s possible to maintain a distressed look even after repairing ripped jeans. You can strategically distress the fabric around the repaired area by using sandpaper, a cheese grater, or other distressing techniques to create a consistent appearance.
10.5: Should I reinforce the repair from the inside?
Reinforcing the repair from the inside can provide extra strength and stability. You can do this by applying a small fabric patch or stitching a fabric backing behind the repaired area. This reinforcement helps distribute the stress on the fabric and prevents the rip from reappearing.


